With the core Action! Library window routines complete, I moved to converting the menu routine, and the first gadget. The menu routine converted is MenuV(), which is a vertical stacked menu. The first gadget to be converted is GAlert() which simply displays a message in a window and waits for a keypress.
As a reminder the actual library source code is being withheld until the conversion is completed. Here is the source for the sample program which demonstrates calling the routines. The command line used to compile is noted in the header comment:
// ------------------------------------------------------------
// Program: menuv.c
// Desc...: A8 Library Menu and Alert Test
// Author.: Ripdubski
// Date...: 202208
// Notes..: cl65 -v [-O] -t atarixl menuv.c -o menuv.xex
// ------------------------------------------------------------

// Pull in include files
#include <stdio.h>
#include <conio.h>
#include <unistd.h>
#include <string.h>
#include <atari.h>

// Converted Action! library files
// Redacted until full conversion complete.
#include "a8defines.h"
#include "a8defwin.h"
#include "a8libmisc.c"
#include "a8libstr.c"
#include "a8libwin.c"
#include "a8libgadg.c"
#include "a8libmenu.c"


// ------------------------------------------------------------
// Func...: void main(void)
// Desc...: Main routine
// ------------------------------------------------------------
void main(void)
{
    // Variables
    byte bW1, bW2, bC, bD;
    unsigned char *pcM[7] = { " Alert        ", " Progress     ", " Buttons      ", " Checkboxes   ", " Radio Button ", " Quit         " };

    // Setup screen
    WInit();
    WBack(14);

    // Open windows
    bW1 = WOpen(0, 0, 40, 3, WON);
    WPrint(bW1, WPCNT, 1, WOFF, "CC65 A8 Menu Test");
    bW2 = WOpen(12, 6, 16, 10, WOFF);
    WOrn(bW2, WPTOP, WPCNT, "Menu");

    // Set done to false
    bD = FALSE;

    // Loop until done (Quit selected)
    while (! bD)
    {
        // Call menu
        bC = MenuV(bW2, 1, 2, WON, 1, 6, pcM);

        // Process choice
        switch (bC)
        {
            // For each option, show an alert using the GAlert gadget.
            case 1: GAlert("Alert! menu option 1 selected!");
                    break;

            case 2: GAlert("Alert! menu option 2 selected!");
                    break;

            case 3: GAlert("Alert! menu option 3 selected!");
                    break;

            case 4: GAlert("Alert! menu option 4 selected!");
                    break;

            case 5: GAlert("Alert! menu option 5 selected!");
                    break;

            // Quit option, set exit to true
            case 6: bD = TRUE;
                    break;
        }
    }

    // Wait for a keypress
    while (! kbhit()) { };

    // Close windows
    WClose(bW2);
    WClose(bW1);

    // Exit
    return;
}
With the ATASCII to Internal code routines converted from my Action! library and now working, as well as the libraries wait functions, I was able to start on the windowing library routines. The only larger part of the library are the window gadgets which I’ll get to in future posts.
First I converted the WInit() function which clears all the memory for the window system, and sets all the handle information to its defaults, setups of the screen by clearing it, and setting the left margin to 0.
I then started converting WBack() which sets the background display character. It uses memset to accomplish this so it is very quick. With that working, I then did the basic WOpen() function which simply saves and clears the area of the screen the window will occupy, via memcpy and memset, and then draws the window frame. I then completed the WClose() routine which restores the contents of the screen the window covered, again via memcpy. The use of memcpy and memset makes the routines very fast, even with calling StrAI() routines to get the display to internal code first.
Once the window open and close was working, I moved to implement WPos() and WPut(). WPos() moves the window system virtual cursor to a coordinate within the given window, or it can be used to position the physical cursor to an absolute position (same as CC65 gotoxy() function). The WPut() function allows you to place a single character in a given window.
Next I completed the WPrint() routine, which is used to print text into a given window. During this conversion, I changed the call slightly from Action!’s. I did it to make it a little more flexible in regards to displaying inverse text and coding in CC65 on the Mac which doesn’t allow entry of ATASCII characters into the source code.
With WPrint() complete, I moved to WOrn() which allows the placement of ornaments onto the top and bottom window frames in either the left, right, or center positions.
Next I converted the WStatus() function which returns if a window handle is in use or not. I then built a loop into the test program to display the status of each window handle.
With all that working I converted the WClr() function from my Action! library. This function clears the contents of the window (inside the frame). I then put some wait for key pauses in the test/demo program to validate everything worked as expected.
Here is the source code for the test/demo program. As in the last post, the use of byte is present, which represents an unsigned char. unsigned char’s should be used in loops where possible with CC65 because their access is quicker, making the loops execution time faster. There is a full explanation on the CC65 website:
// ------------------------------------------------------------
// Program: testwin.c
// Desc...: A8 Library Windows Test
// Author.: Ripdubski
// Date...: 202208
// Notes..: cl65 -v [-O] -t atarixl testwin.c -o testwin.xex
// ------------------------------------------------------------

// Pull in include files
#include <stdio.h>
#include <conio.h>
#include <string.h>
#include <atari.h>

// The next 4 are part of the converted Action! library.
#include "a8defines.h"
#include "a8defwin.h"
#include "a8libstr.c"
#include "a8libwin.c"


// ------------------------------------------------------------
// Func...: void main(void)
// Desc...: Main routine
// ------------------------------------------------------------
void main(void)
{
    // Variables
    byte bW1, bW2, bL;
    unsigned char cL[40];

    // Initialize window system, and setup screen
    WInit();
    WBack(14);

    // Open title window
    bW1 = WOpen(0, 0, 40, 3, WON);
    WPrint(bW1, WPCNT, 1, WOFF, "CC65 Window Test");

    // Open status window, display ornaments, and divider
    bW2 = WOpen(4, 6, 32, 14, WOFF);
    WOrn(bW2, WPTOP, WPLFT, "TL");
    WOrn(bW2, WPTOP, WPRGT, "TR");
    WOrn(bW2, WPTOP, WPCNT, "Status");
    WOrn(bW2, WPBOT, WPLFT, "BL");
    WOrn(bW2, WPBOT, WPRGT, "BR");
    WDiv(bW2, 11, WON);
    WPrint(bW2, WPCNT, 12, WOFF, "Divided Window");

    // Use WPOS and WPUT in both inverse and regular windows
    WPos(bW1, 38, 1);
    WPut(bW1, 49);   // 1
    WPos(bW2, 30, 1);
    WPut(bW2, 50);   // 2

    // Get and display status of each window handle
    for (bL=0; bL < 10; bL++)
    {
        // Get window status
        // Create formatted display string in char array
        if (WStat(bL) == WON)
        {
            sprintf(cL, "Window %d = In Use", bL);
        }
        else
        {
            sprintf(cL, "Window %d = Not Used", bL);
        }
        // Print the string to the window
        WPrint(bW2, 1, bL+1, WOFF, cL);
    }

    // Wait for a keypress (just used conio function)
    cgetc();

    // Turn off divider
    WDiv(bW2, 11, WOFF);

    // Wait for a keypress
    cgetc();

    // Clear window
    WClr(bW2);

    // Wait for a keypress
    while (! kbhit()) { };

    // Close windows
    WClose(bW2);
    WClose(bW1);

    // Exit
    return;
}
Screenshot of all the window functions being used:
Breakdown of what is being shown:
The background is painted with a period character using WBack() function.
The title window at the top is flagged to be opened in inverse with the WOpen() call.
The text “CC65 Window Test” is printed on the 1st row of the window with the CENTER flag enabled in the call to WPrint().
The status window is opened as the second window. The WOrn() function is used to set the “Status” title ornament in the center on the top of the frame.
The “TL” ornament is displayed on the frame using the WOrn() function called with TOP and LEFT.
The “TR” ornament is displayed on the frame using the WOrn() function called with TOP and RIGHT.
The “BL” ornament is displayed on the frame using the WOrn() function called with BOTTOM and LEFT.
The “BR” ornament is displayed on the frame using the WOrn() function called with BOTTOM and RIGHT.
The lower window divider is created using the WDiv() function.
The “Divided Window” test is printed on the last row of the window with the CENTER flag enabled in the call to WPrint().
The “1” and the “2” in the upper right corners of each window are displayed using the WPut() function.
Each text line (“Window x = <status>”) is displayed using WPrint().
In this post I show evidence of two routines having been converted. The first is WaitYN(), and the second is WaitKCX(). WaitYN() simply waits for Y or N to be pressed, only allowing those keystrokes (upper or lower). WaitKCX() waits for any key to be pressed. It will optionally process the inverse key to toggle the inverse text function, or just pass back the inverse key press. It also handle CAPS lock without intervention. WaitKCX() also checks for the HELP key on XL’s, F1-F4 on the 1200XL, and checks for the console keys being pressed (Start, Select, Option). I don’t have a 1200XL to test F1 to F4, though I think the code will work based on technical documents.
The code for the test/demo program follows. It won’t compile without the forthcoming library release. The command used to compiles is in the header comment. Also of note, you will see variable types byte and word which are not C. These are implemented as type definitions. byte equates to an unsigned char. word equates to an unsigned int.
// ------------------------------------------------------------
// Program: waitk.c
// Desc...: Wait Key demonstration
// Author.: Ripdubski
// Date...: 202208
// Notes..: cl65 -v -O -t atarixl waitk.c -o waitk.xex
// ------------------------------------------------------------

// Pull in include files
#include <stdio.h>
#include <conio.h>
#include <string.h>
#include <peekpoke.h>
#include <atari.h>

// The next two are part of my Action! library conversion.
#include "a8defines.h"
#include "a8libmisc.c"


// ------------------------------------------------------------
// Func...: void main(void)
// Desc...: Main routine
// ------------------------------------------------------------
void main(void)
{
    // Declare vars
    byte bR;
    word cK;

    // Setup screen
    clrscr();
    printf("-[CC65 Wait Key Test]-------------------");

    // Show prompt, then call WaitYN to wait for Y or N keypress
    printf("Press Y or N: ");
    WaitYN(WON);

    printf("\nPress any key (ESC to exit).\n");

    // Loop until exit is triggered  (ESC pressed)
    bR = 0;
    while (bR == 0)
    {
        // Call WaitKCX.  Passing WON tells it to process the inverse key
        // rather than just pass back that it was pressed.
        cK = WaitKCX(WON);

        // For special keys, print a message when pressed
        if (cK == KINV)
        {
            printf("Inverse\n");
        }
        else if (cK == KFHLP)
        {
            printf("Help\n");
        }
        else if (cK == KCSTA)
        {
            printf("Start\n");
        }
        else if (cK == KCSEL)
        {
            printf("Select\n");
        }
        else if (cK == KCOPT)
        {
            printf("Option\n");
        }
        else if (cK == KCAP)
        {
            printf("Caps\n");
        }
        // For ESC, print the message, and set the exit flag
        else if (cK == KESC)
        {
            printf("Escape\n");
            bR = 1;
        }
        else if (cK == KSPACE)
        {
            printf("Space\n");
        }
        // For all other keypresses, display the key value
        else
        {
            printf("%i\n", cK);
        }
    }

    // Exit
    return;
}
I didn’t want to go into a whole lot of C basics in my previous posts, just refreshing my memory on arrays and pointers was the main objective. In the next series of posts I will be showing the progression of the conversion of my Action! library into C (CC65). In this first post, I convert and demonstrate routines that convert from Atari 8 bit ATASCII codes to internal codes and back. The routines themselves (source code) will be presented with the entire library once the conversion is complete.
Why do I want to convert to internal code from ATASCII? Simple, direct screen I/O. With the internal code, a byte can be placed directly into screen memory without going through the I/O routines, making it much faster.
This is the source for the test program. The routines being tested are StrAI() and StrIA(). StrAI() converts a string from ATASCII code to internal code. StrIA() converts from internal code to ATASCII. These routine require you to pass the length of the string (char array) to be converted. This is required because the internal code for space is 0, which is the C string termination value. When dealing with Atari internal coded strings, most C string functions won’t perform as expected if there is a space in the string.
// ------------------------------------------------------------
// Program: strai.c
// Desc...: String ATASCII->Internal demonstration
// Author.: Ripdubski
// Date...: 202208
// Notes..: cl65 -v -O -t atari strai.c -o strai.xex
// ------------------------------------------------------------

// Pull in include files
#include <stdio.h>
#include <conio.h>
#include <string.h>
#include <atari.h>
#include "a8defines.h"


// ------------------------------------------------------------
// Func...: void StrAI(unsigned char *pS, byte bS)
// Desc...: Converts string from ATASCII code to internal code
// Param..: pS = pointer to string to convert
//          bS = size (number) of chars in string to convert
// Notes..: Manual iteration so we can process space which has
//          0 as internal code (c string terminator).
// ------------------------------------------------------------
void StrAI(unsigned char *pS, byte bS)
{
    // REDACTED until release
}


// ------------------------------------------------------------
// Func...: void StrIA(unsigned char *pS, byte bS)
// Desc...: Converts string from internal code to ATASCII code
// Param..: pS = pointer to string to convert
//          bS = size (number) of chars in string to convert
// Notes..: Manual iteration so we can process space which has
//          0 as internal code (c string terminator).
// ------------------------------------------------------------
void StrIA(unsigned char *pS, byte bS)
{
    // REDACTED until release
}


// ------------------------------------------------------------
// Func...: void main(void)
// Desc...: Main routine
// ------------------------------------------------------------
void main(void)
{
    // Declare char and char array
    char ca[11];

    // Setup screen
    clrscr();
    printf("-[CC65 ATASCII->Internal Tests]---------");

    // Show char array and address
    printf("\nCHAR ARRAY\n");
    strcpy(ca, "1234567890");
    printf("  ca (array): %s\n", ca);
    printf(" &ca address: %p\n", &ca);

    // Convert to internal
    StrAI(ca, 10);
    printf(" ca internal: %s\n", ca);

    // Convert to atascii
    StrIA(ca, 10);
    printf("  ca atascii: %s\n", ca);

    // Wait for a keypress
    while (! kbhit()) { };

    // Exit
    return;
}
Screenshot of the test program showing the successful conversion from ATASCII to internal and back to ATASCII:
Here, i return back to array handling and manipulation. I wanted to work some more with passing arrays between functions to get a better handled on it. This program works with an array of arrays, something not quite possible in Action!.
First the program creates an array of 3 char arrays (strings). It prints the address of the array pointer, then prints each array element (string). Then it passes a pointer to the array and the number of elements to a function, which in turn prints each element (string) of the array.
Here is code
// ------------------------------------------------------------
// Program: arrays.c
// Desc...: Array demonstration
// Author.: Ripdubski
// Date...: 202208
// Notes..: cl65 -v -O -t atari arrays.c -o arrays.xex
// ------------------------------------------------------------

// Pull in include files
#include <stdio.h>
#include <conio.h>
#include <string.h>
#include <atari.h>


// ------------------------------------------------------------
// Func...: void show(unsigned char **pcS, unsigned char cM)
// Desc...: Shows each array element
// Param..: pcS = pointer to array of strings
//           cM = number of elements
// ------------------------------------------------------------
void show(unsigned char **pcS, unsigned char cM)
{
    unsigned char cL;

    printf(" # elements: %d\n", cM);
    printf("pcS address: %p\n", pcS);

    // Loop through each array element and print it
    for (cL=0; cL<cM; cL++)
    {
        printf("Index %d: %s\n", cL, pcS[cL]);
    }
}


// ------------------------------------------------------------
// Func...: void main(void)
// Desc...: Main routine
// ------------------------------------------------------------
void main(void)
{
    // Loop var
    unsigned char cL;

    // Declare array of strings (non changeable)
    unsigned char *cS[4] = { "Element 1", "Element 2", "Element 3" };

    // Setup screen
    clrscr();
    printf("-[CC65 Array Tests]---------------------");

    // Show strings from main loop
    printf("\nStrings (main)\n");
    printf(" cS address: %p\n", cS);

    for (cL=0; cL<3; cL++)
    {
        printf("Index %d: %s\n", cL, cS[cL]);
    }

    // Manipulate string thru function
    printf("\nStrings (function)\n");
    show(cS, 3);

    // Wait for a keypress
    while (! kbhit()) { };

    // Exit
    return;
}
This is the command used to compile:
cl65 -v -t atarixl arrays.c -o arrays.xex
The is the build output:
$ cl65 -v -t atarixl arrays.c -o arrays.xex
Opened include file '/usr/local/share/cc65/include/stdio.h'
Opened include file '/usr/local/share/cc65/include/stddef.h'
Opened include file '/usr/local/share/cc65/include/stdarg.h'
Opened include file '/usr/local/share/cc65/include/conio.h'
Opened include file '/usr/local/share/cc65/include/atari.h'
Opened include file '/usr/local/share/cc65/include/_gtia.h'
Opened include file '/usr/local/share/cc65/include/_pbi.h'
Opened include file '/usr/local/share/cc65/include/_pokey.h'
Opened include file '/usr/local/share/cc65/include/_pia.h'
Opened include file '/usr/local/share/cc65/include/_antic.h'
Opened include file '/usr/local/share/cc65/include/string.h'
Opened include file '/usr/local/share/cc65/include/stddef.h'
Opened include file '/usr/local/share/cc65/include/atari.h'
0 errors, 0 warnings
Opened output file 'arrays.s'
Wrote output to 'arrays.s'
Closed output file 'arrays.s'
Opened 'arrays.xex'...
  Dumping 'HEADER'
    Writing 'EXEHDR'
  Dumping 'SYSCHKHDR'
    Writing 'SYSCHKHDR'
  Dumping 'SYSCHKCHNK'
    Writing 'SYSCHK'
  Dumping 'SYSCHKTRL'
    Writing 'SYSCHKTRL'
  Dumping 'SRPREPHDR'
    Writing 'SRPREPHDR'
  Dumping 'SRPREPCHNK'
    Writing 'LOWBSS'
    Writing 'SRPREP'
    Writing 'SHADOW_RAM'
    Writing 'SHADOW_RAM2'
  Dumping 'SRPREPTRL'
    Writing 'SRPREPTRL'
  Dumping 'MAINHDR'
    Writing 'MAINHDR'
  Dumping 'MAIN'
    Writing 'STARTUP'
    Writing 'LOWCODE'
    Writing 'ONCE'
    Writing 'CODE'
    Writing 'RODATA'
    Writing 'DATA'
    Writing 'BSS'
  Dumping 'TRAILER'
    Writing 'AUTOSTRT'
After reviewing the CC65 documentation, I noticed some functions that are similar to Action!. Specifically PeekW() to peek a word rather than a byte. To confirm it works as I think, I wrote a small program to determine a memory address via high byte & low byte calculation, and get the same address using peek word.
Here I grab the high byte and low byte of the screen memory vector using single byte peeks, then compute the address (high byte * 256, then add the low byte). I then use the word peek to get the address. The results are printed to confirm they match.
// ------------------------------------------------------------
// Program: peekpoke.c
// Desc...: Peek & Poke demonstration
// Author.: Ripdubski
// Date...: 202208
// Notes..: cl65 -v -O -t atari peekpoke.c -o peekpoke.xex
// ------------------------------------------------------------

// Pull in include files
#include <stdio.h>
#include <conio.h>
#include <peekpoke.h>
#include <atari.h>


// ------------------------------------------------------------
// Func...: void main(void)
// Desc...: Main routine
// ------------------------------------------------------------
void main(void)
{
    // Declare vars
    unsigned int iW, cW;
    unsigned char cL,cH;

    // Setup screen
    clrscr();
    printf("-[CC65 Peek/Poke Test]------------------");

    // Show integer value and address of variable i
    printf("\nPEEK\n");

    // Byte Peeks
    cL = PEEK(88);
    cH = PEEK(89);

    // Word Peek
    iW = PEEKW(88);

    // Compute byte peek address
    cW = (cH * 256) + cL;

    // Show results
    printf("peek byte cH: %d\n", cH);
    printf("peek byte cL: %d\n", cL);
    printf("     address: %u\n", cW);
    printf("peekw int iW: %u\n", iW);

    printf("press any key\n");

    while (! kbhit())  {}

    // Exit
    return;
}
The command used to build:
cl65 -v -O -t atarixl peekpoke.c -o peekpoke.xex
The output of the build process:
$ cl65 -v -t atarixl peekpoke.c -o peekpoke.xex
Opened include file '/usr/local/share/cc65/include/stdio.h'
Opened include file '/usr/local/share/cc65/include/stddef.h'
Opened include file '/usr/local/share/cc65/include/stdarg.h'
Opened include file '/usr/local/share/cc65/include/conio.h'
Opened include file '/usr/local/share/cc65/include/atari.h'
Opened include file '/usr/local/share/cc65/include/_gtia.h'
Opened include file '/usr/local/share/cc65/include/_pbi.h'
Opened include file '/usr/local/share/cc65/include/_pokey.h'
Opened include file '/usr/local/share/cc65/include/_pia.h'
Opened include file '/usr/local/share/cc65/include/_antic.h'
Opened include file '/usr/local/share/cc65/include/string.h'
Opened include file '/usr/local/share/cc65/include/stddef.h'
Opened include file '/usr/local/share/cc65/include/peekpoke.h'
Opened include file '/usr/local/share/cc65/include/atari.h'
0 errors, 0 warnings
Opened output file 'peekpoke.s'
Wrote output to 'peekpoke.s'
Closed output file 'peekpoke.s'
Opened 'peekpoke.xex'...
  Dumping 'HEADER'
    Writing 'EXEHDR'
  Dumping 'SYSCHKHDR'
    Writing 'SYSCHKHDR'
  Dumping 'SYSCHKCHNK'
    Writing 'SYSCHK'
  Dumping 'SYSCHKTRL'
    Writing 'SYSCHKTRL'
  Dumping 'SRPREPHDR'
    Writing 'SRPREPHDR'
  Dumping 'SRPREPCHNK'
    Writing 'LOWBSS'
    Writing 'SRPREP'
    Writing 'SHADOW_RAM'
    Writing 'SHADOW_RAM2'
  Dumping 'SRPREPTRL'
    Writing 'SRPREPTRL'
  Dumping 'MAINHDR'
    Writing 'MAINHDR'
  Dumping 'MAIN'
    Writing 'STARTUP'
    Writing 'LOWCODE'
    Writing 'ONCE'
    Writing 'CODE'
    Writing 'RODATA'
    Writing 'DATA'
    Writing 'BSS'
  Dumping 'TRAILER'
    Writing 'AUTOSTRT'
It has been many years since I seriously programmed in C so I needed to reacquaint myself with some of the language mechanics. I was particular concerned with ensuring I understood pointers, arrays, and passing these between functions. I started out with exploring pointer handling.
I created a program that created an integer, a char, and a char array, and pointers to each one. It then manipulates the char via the variable and the pointer, and prints the values to verify the values are changing as expected. For the integer, it just displays the value and the address. For the char array I just print the array then the array address using the address operator and without it. Then I have the program pass the char array to a function several times to manipulate a portion of it each time (inversing 5 to 10 characters – 5 chars, then 10, then 5, then 10), while the main calling routine prints the char array out to confirm the changes were as expected.
Here is my source:
// ------------------------------------------------------------
// Program: pointers.c
// Desc...: Pointer demonstration
// Author.: Wade Ripkowski
// Date...: 20220809
// Notes..: cl65 -v -O -t atari pointers.c -o pointers.xex
// ------------------------------------------------------------

// Pull in include files
#include <stdio.h>
#include <conio.h>
#include <string.h>
#include <atari.h>


// ------------------------------------------------------------
// Func...: void invstr(char *pcs, unsigned char bs)
// Desc...: Inverses bs chars of a string
// Param..: pcs = pointer to string to inverse
//          bs = size (number) of chars in string to inverse
// ------------------------------------------------------------
void invstr(char *pcs, unsigned char bs)
{
    unsigned char bL;

    // Loop through number of requested chars
    for (bL=0; bL<bs; bL++)
    {
        // Dereference, change char value by 128, increment pointer
        *(pcs++) ^= 128;
    }
}


// ------------------------------------------------------------
// Func...: void main(void)
// Desc...: Main routine
// ------------------------------------------------------------
void main(void)
{
    // Declare int and set value
    int i = 5;
    // Declare char and char array
    char c, ca[11];
    // Declare char pointer and set to address of defined char
    char *pc = &c;

    // Setup screen
    clrscr();
    printf("-[CC65 Pointer Tests]-------------------");

    // Show integer value and address of variable i
    printf("\nINTEGER\n");
    printf("         i (int): %d\n", i);
    printf("       i address: %p\n", &i);

    // Show char value and pointer value
    printf("\nCHAR\n");
    c = 65;
    printf("   orig c (char): c=%d, *pc=%d\n", c, *pc);
    // Change the char value, reshow values
    c = 66;
    printf("           mod c: c=%d, *pc=%d\n", c, *pc);
    // Change the char value thru the pointer, reshow values
    *pc = 67;
    printf("         mod *pc: c=%d, *pc=%d\n", c, *pc);

    // Show char array and address
    printf("\nCHAR ARRAY\n");
    strcpy(ca, "1234567890");
    printf("      ca (array): %s\n", ca);
    printf("     &ca address: %p\n", &ca);
    printf("      ca address: %p : %s\n", ca, ca);
    printf("    ca address+2: %p : %s\n", ca+2, ca+2);

    // Manipulate string thru function
    printf("\nFUNCTION MANIPULATION\n");

    // Flip 1st 5 chars of string
    // first half inverted
    invstr(ca, 5);
    printf("        ca inv 5: %s\n", ca);

    // Flip all 10 chars of string
    // first half now normal, second half now inverted
    invstr(ca, 10);
    printf("       ca inv 10: %s\n", ca);

    // Flip 1st 5 chars of string again
    // all 10 inverted now
    invstr(ca, 5);
    printf("        ca inv 5: %s\n", ca);

    // Flip all 10 chars of string agian
    // all 10 back to normal now
    invstr(ca, 10);
    printf("       ca inv 10: %s\n", ca);

    // Wait for a keypress
    while (! kbhit()) { };

    // Exit
    return;
}
I used this command to build it. I won’t repeat what each of the parameters are, as I explained that in the last post:
cl65 -v -O -t atarixl pointers.c -o pointers.xex
Output of the build process:
$ cl65 -v -t atarixl pointers.c -o pointers.xex
Opened include file '/usr/local/share/cc65/include/stdio.h'
Opened include file '/usr/local/share/cc65/include/stddef.h'
Opened include file '/usr/local/share/cc65/include/stdarg.h'
Opened include file '/usr/local/share/cc65/include/conio.h'
Opened include file '/usr/local/share/cc65/include/atari.h'
Opened include file '/usr/local/share/cc65/include/_gtia.h'
Opened include file '/usr/local/share/cc65/include/_pbi.h'
Opened include file '/usr/local/share/cc65/include/_pokey.h'
Opened include file '/usr/local/share/cc65/include/_pia.h'
Opened include file '/usr/local/share/cc65/include/_antic.h'
Opened include file '/usr/local/share/cc65/include/string.h'
Opened include file '/usr/local/share/cc65/include/stddef.h'
Opened include file '/usr/local/share/cc65/include/atari.h'
0 errors, 0 warnings
Opened output file 'pointers.s'
Wrote output to 'pointers.s'
Closed output file 'pointers.s'
Opened 'pointers.xex'...
  Dumping 'HEADER'
    Writing 'EXEHDR'
  Dumping 'SYSCHKHDR'
    Writing 'SYSCHKHDR'
  Dumping 'SYSCHKCHNK'
    Writing 'SYSCHK'
  Dumping 'SYSCHKTRL'
    Writing 'SYSCHKTRL'
  Dumping 'SRPREPHDR'
    Writing 'SRPREPHDR'
  Dumping 'SRPREPCHNK'
    Writing 'LOWBSS'
    Writing 'SRPREP'
    Writing 'SHADOW_RAM'
    Writing 'SHADOW_RAM2'
  Dumping 'SRPREPTRL'
    Writing 'SRPREPTRL'
  Dumping 'MAINHDR'
    Writing 'MAINHDR'
  Dumping 'MAIN'
    Writing 'STARTUP'
    Writing 'LOWCODE'
    Writing 'ONCE'
    Writing 'CODE'
    Writing 'RODATA'
    Writing 'DATA'
    Writing 'BSS'
  Dumping 'TRAILER'
    Writing 'AUTOSTRT'
I was working on a large program for the Atari 8 bit in the Action! language, which is a fine language in and of itself, and has been my favorite language for the platform. I ran into a couple of limitations that prompted me to look at alternatives.
One of those limitations comes into play when the Action! program is compiled into a stand alone application (ie: run without the cartridge present). In this form, you may only pass two bytes through a function call. There are some work arounds, but they would add to the code size and require many adaptations to the Action! library I’ve written.
The other limitation is the stack size. It is rather small. It can be expanded, but not large enough.
I looked at the Atari 8 bit pascal compilers and found that each one had something I didn’t care for. I then started looking at the C compilers. Of the ones that run natively on the Atari 8 bit, I again found something I didn’t care for in each one. Then I remembered CC65 (https://cc65.github.io) , a cross platform 6502 C compiler. I used this back in 2016 while working on a small game. I decided to look at it again.
The first hurdle was getting it running on an Apple M1 Mac. Previously I ran it on an Intel based Apple Mac but just downloading the source and compiling it. This doesn’t work straight up on the M1 Mac. I found the easiest way to get it running was to install Homebrew (https://brew.sh), then use Homebrew to install it with the command:
brew install cc65
Simple!
After browsing through the CC65 online documentation I set out to create a simple hello world application to test the build process. I will note that the CC65 documentation is incomplete, and noted as such. You can view the source code when you need more. The project also seeks volunteers to assist. For building, I am using Microsoft Visual Code (https://code.visualstudio.com), MacOS Terminal, and Atari800MacX (http://atarimac.com/atari800macx.php) Atari 8 bit emulator.
My hello world program prints a few more things than just hello world, and it waits for a keystroke before exiting. I wanted it to wait for a keystroke so when running the XEX executable directly from the MacOS Finder, it would pause before exiting the emulator.
In order to wait for a key, I either needed the peekpoke header so I could peek location 764 for a keystroke, or use the CC65 function kbhit() which needs the conio header. I chose the latter.
Here is the source:
// ------------------------------------------------------------
// Program: hello.c
// Desc...: Hello World CC65 demonstration
// Author.: Ripdubski
// Date...: 202208
// Notes..: cl65 -v -O -t atari hello.c -o hello.xex
// ------------------------------------------------------------

// Pull in include files
#include <stdio.h>
#include <conio.h>
#include <atari.h>


// ------------------------------------------------------------
// Func...: void main(void)
// Desc...: Main routine
// ------------------------------------------------------------
void main(void)
{
    // Setup screen
    clrscr();
    printf("-[CC65 Hello World Test]----------------");

    // Display hello world
    printf("\nHello World from CC65!\n");

    // Wait for a key
    printf("\npress any key\n");
    while (! kbhit())  {}

    // Exit
    return;
}
Simple enough!
To compile, I used the following command. This command does the compile and link. The “-v” parameter is the verbose flag. The “-O” parameter turns on optimization. The “-t” parameter tells CC65 which platform to target. The target can be either “atari” or “atarixl”, you can read up on the differences on the CC65 site. The “-o” parameter tells CC65 the name of the executable file to build:
cl65 -v -O -t atarixl hello.c -o hello.xex
The build process produced the following output:
$ cl65 -v -O -t atarixl hello.c -o hello.xex
Opened include file '/usr/local/share/cc65/include/stdio.h'
Opened include file '/usr/local/share/cc65/include/stddef.h'
Opened include file '/usr/local/share/cc65/include/stdarg.h'
Opened include file '/usr/local/share/cc65/include/conio.h'
Opened include file '/usr/local/share/cc65/include/atari.h'
Opened include file '/usr/local/share/cc65/include/_gtia.h'
Opened include file '/usr/local/share/cc65/include/_pbi.h'
Opened include file '/usr/local/share/cc65/include/_pokey.h'
Opened include file '/usr/local/share/cc65/include/_pia.h'
Opened include file '/usr/local/share/cc65/include/_antic.h'
Opened include file '/usr/local/share/cc65/include/atari.h'
0 errors, 0 warnings
Running optimizer for function 'main'
Opened output file 'hello.s'
Wrote output to 'hello.s'
Closed output file 'hello.s'
Opened 'hello.xex'...
  Dumping 'HEADER'
    Writing 'EXEHDR'
  Dumping 'SYSCHKHDR'
    Writing 'SYSCHKHDR'
  Dumping 'SYSCHKCHNK'
    Writing 'SYSCHK'
  Dumping 'SYSCHKTRL'
    Writing 'SYSCHKTRL'
  Dumping 'SRPREPHDR'
    Writing 'SRPREPHDR'
  Dumping 'SRPREPCHNK'
    Writing 'LOWBSS'
    Writing 'SRPREP'
    Writing 'SHADOW_RAM'
    Writing 'SHADOW_RAM2'
  Dumping 'SRPREPTRL'
    Writing 'SRPREPTRL'
  Dumping 'MAINHDR'
    Writing 'MAINHDR'
  Dumping 'MAIN'
    Writing 'STARTUP'
    Writing 'LOWCODE'
    Writing 'ONCE'
    Writing 'CODE'
    Writing 'RODATA'
    Writing 'DATA'
    Writing 'BSS'
  Dumping 'TRAILER'
    Writing 'AUTOSTRT'
Here is a screenshot of the success:
In the next few posts I will document some more experiments I did with the language which helped me remember how pointers and arrays work in C. I have already started converting my Action! library to C (CC65), and will also document that with the end result being the release of the library for use with C (CC65).
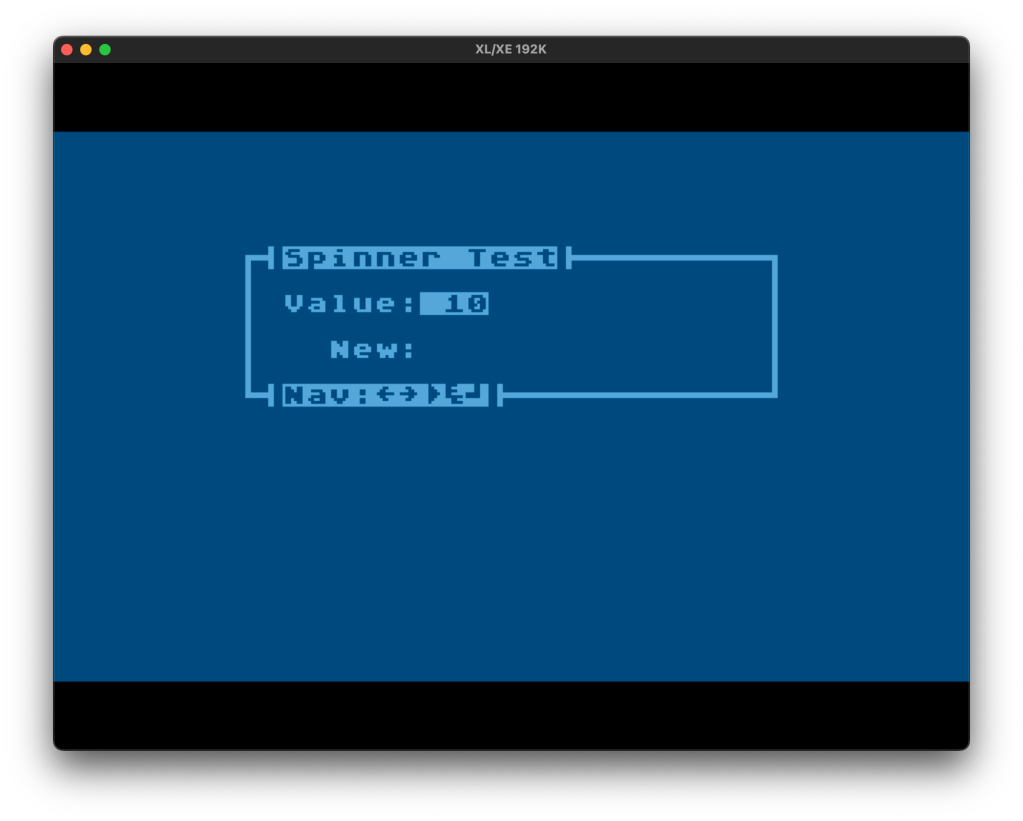
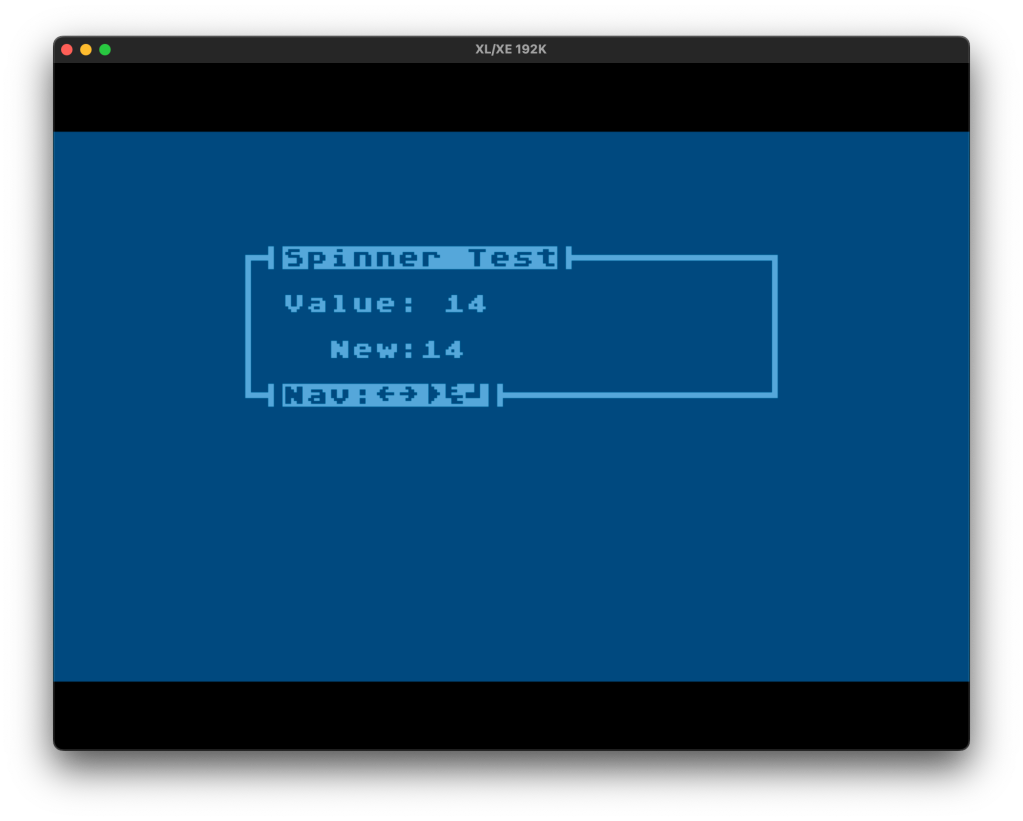
Before I concentrate on the FujiNet and SQL bindings for the library, I have made one last update to add a new gadget and input function. I also added some screen shots to the documentation to make it easier to visualize what some of the gadgets do. This is the 1.5 release.
Gadget added: GSpin()
Numeric input spinner control.
Input added: WaitKCX()
This function expands on WaitKC. It is intended for XL/XE computers and will properly handle the HELP key, and F1 through F4. It will also handle the inverse key found on all 8 bit lines, as well as toggle the case when CAPS is pressed.
Input modified: WaitKC()
This function will now handle toggling the case when CAPS is pressed.
The disk image is ATR, however, it was uploaded with a “.ODT” extension due to hosting provided restrictions. Simply download it, rename it so “.ATR” is the only extension. The API documentation is in PDF format.
Version 1.6 will include the FujiNet and SQL bindings. I do not have an ETA on that release yet.
Downloads
Library ATR file (ActionLibV15.ATR):
deprecated
Library PDF API Document (ActionLibReference_150-A.pdf):
deprecated
Here is a video of a sample application written using the library and its latest features:
I’ve been working on a new program and decided I needed a numeric input spinner rather than using the GInput() gadget I wrote before. The GInput gadget works well and can limit to entry to numeric fields, but when using it with small numbers that are only 1 or 2 digits wide, it becomes confusing to use due to the cursor movement across that limited cell count. On top of that, there is numeric conversion from the string that GInput returns that must be dealt with in accommodating numeric sizes.
This new gadget is designed for small numbers (bytes) from 0 to 100. It can be used for number values up to 252. The last 3 values are reserved for gadget and form control. It increments and decrements with up, down, left, and right keys. It also allows for limiting the value to a lower and upper value.
Here I present the new function in my gadget library called GSpin(). This function can be used on an input form with other input gadgets or by itself. It will be included in the next release of the library. Essentially when it becomes active, the value is inversed and updated as the keystroked move the value up and down.
Code
; --------------------------------------
; Func..: GSpin(BYTE bN,x,y,bL,bM,bP)
; Desc..: Displays value and spin 0 to 100
; Params: bN = Window handle number
;         x = Column of window to place spinner
;         y = Row of window
;         bL = Lowest value
;         bM = Max value
;         bP = initial value
; Req...: LIBWIN.ACT
;         LIBSTR.ACT
; --------------------------------------
BYTE FUNC GSpin(BYTE bN,x,y,bL,bM,bP)
BYTE bD,bK,bR
CHAR ARRAY cL(4)

; Set working value
bD=bP

; Loop until exit
DO
  ; Convert to string & inverse
  StrB(bD,cL)
  StrPad(cL,32,3)
  StrInv(cL,cL(0))

  ; Print value at spot
  WPrint(bN,x,y,cL)

  ; Get key
  bK=WaitKC()

  ; Process keystroke
  if bK=KLEFT or bK=KPLUS or bK=KDOWN or bK=KEQUAL then
    bD==-1
    if bD<bL then bD=bL fi

  elseif bK=KRIGHT or bK=KASTER or bK=KUP or bK=KMINUS then
    bD==+1
    if bD>bM then bD=bM fi

  elseif bK=KESC then
    bR=XESC

    ; Convert to string
    StrB(bP,cL)

    exit

  elseif bK=KTAB then
    bR=XTAB

    ; Convert to string
    StrB(bP,cL)

    exit

  elseif bK=KENTER then
    ; Set return value
    bR=bD

    ; Convert to string
    StrB(bD,cL)

    exit
  fi
OD

; Redisplay value
StrPad(cL,32,3)
WPrint(bN,x,y,cL)

RETURN(bR)