Before I concentrate on the FujiNet and SQL bindings for the library, I have made one last update to add a new gadget and input function. I also added some screen shots to the documentation to make it easier to visualize what some of the gadgets do. This is the 1.5 release.
Gadget added: GSpin()
Numeric input spinner control.
Input added: WaitKCX()
This function expands on WaitKC. It is intended for XL/XE computers and will properly handle the HELP key, and F1 through F4. It will also handle the inverse key found on all 8 bit lines, as well as toggle the case when CAPS is pressed.
Input modified: WaitKC()
This function will now handle toggling the case when CAPS is pressed.
The disk image is ATR, however, it was uploaded with a “.ODT” extension due to hosting provided restrictions. Simply download it, rename it so “.ATR” is the only extension. The API documentation is in PDF format.
Version 1.6 will include the FujiNet and SQL bindings. I do not have an ETA on that release yet.
I’ve been working on a new program and decided I needed a numeric input spinner rather than using the GInput() gadget I wrote before. The GInput gadget works well and can limit to entry to numeric fields, but when using it with small numbers that are only 1 or 2 digits wide, it becomes confusing to use due to the cursor movement across that limited cell count. On top of that, there is numeric conversion from the string that GInput returns that must be dealt with in accommodating numeric sizes.
This new gadget is designed for small numbers (bytes) from 0 to 100. It can be used for number values up to 252. The last 3 values are reserved for gadget and form control. It increments and decrements with up, down, left, and right keys. It also allows for limiting the value to a lower and upper value.
Here I present the new function in my gadget library called GSpin(). This function can be used on an input form with other input gadgets or by itself. It will be included in the next release of the library. Essentially when it becomes active, the value is inversed and updated as the keystroked move the value up and down.
Code
; --------------------------------------
; Func..: GSpin(BYTE bN,x,y,bL,bM,bP)
; Desc..: Displays value and spin 0 to 100
; Params: bN = Window handle number
; x = Column of window to place spinner
; y = Row of window
; bL = Lowest value
; bM = Max value
; bP = initial value
; Req...: LIBWIN.ACT
; LIBSTR.ACT
; --------------------------------------
BYTE FUNC GSpin(BYTE bN,x,y,bL,bM,bP)
BYTE bD,bK,bR
CHAR ARRAY cL(4)
; Set working value
bD=bP
; Loop until exit
DO
; Convert to string & inverse
StrB(bD,cL)
StrPad(cL,32,3)
StrInv(cL,cL(0))
; Print value at spot
WPrint(bN,x,y,cL)
; Get key
bK=WaitKC()
; Process keystroke
if bK=KLEFT or bK=KPLUS or bK=KDOWN or bK=KEQUAL then
bD==-1
if bD<bL then bD=bL fi
elseif bK=KRIGHT or bK=KASTER or bK=KUP or bK=KMINUS then
bD==+1
if bD>bM then bD=bM fi
elseif bK=KESC then
bR=XESC
; Convert to string
StrB(bP,cL)
exit
elseif bK=KTAB then
bR=XTAB
; Convert to string
StrB(bP,cL)
exit
elseif bK=KENTER then
; Set return value
bR=bD
; Convert to string
StrB(bD,cL)
exit
fi
OD
; Redisplay value
StrPad(cL,32,3)
WPrint(bN,x,y,cL)
RETURN(bR)
I fixed several issues in my Action! library, and have added many new features. I was going to release this as version 1.5 once I complete some FujiNet and SQL bindings. Those are taking a little longer than anticipated due to time availability.
The functions published individually since the last library update are included, as well as new fully documented API with sample source code. The sample source programs are also included on the library disk.
The disk image is ATR, however, it was uploaded with a “.ODT” extension due to hosting provided restrictions. Simply download it, rename it so “.ATR” is the only extension. The API documentation is in PDF format.
Version 1.5 will include the FujiNet and SQL bindings. I do not have an ETA on that release yet.
Downloads
Library ATR file (ActionLibV14.ATR):
Library PDF API Document (ActionLibReference_140-C.pdf). (If you downloaded this on or before 2202.07.13, download it again as it has a few corrections). This is revision C and the title page now references it:
Here is a video of a sample application written using the library and its latest features:
In this post I show I used the Atari 8 bits Player/Missile graphics to produce a highlighter effect on graphics 0 screen text.
Essentially I am using players defined 8 bits wide and using double line resolution within the player/missile graphics. This equates to an 8×8 graphics 0 character cell with normal player width selected. I chose yellow as the highlight color as you might do on paper.
The only thing you need to watch out for is to ensure you don’t set the player luminance higher than the text luminance. If the player luminance is greater, you won’t be able to see the text behind it.
Using a player definition of 8 bits and combinations of player width of normal, double, and quadruple, you can highlight text at 2, 4, and 8 characters wide with a single player. With 4 players at quadruple width you can highlight 32 characters of the 40 character screen. If you want to use all 4 missiles as one player, you can achieve another 8 character highlight bringing it to the full 40 character screen width.
By placing players of different definitions (4 bits vs 8 bits wide) and player width sizes (single) next to each other you can highlight an odd number of characters.
Example
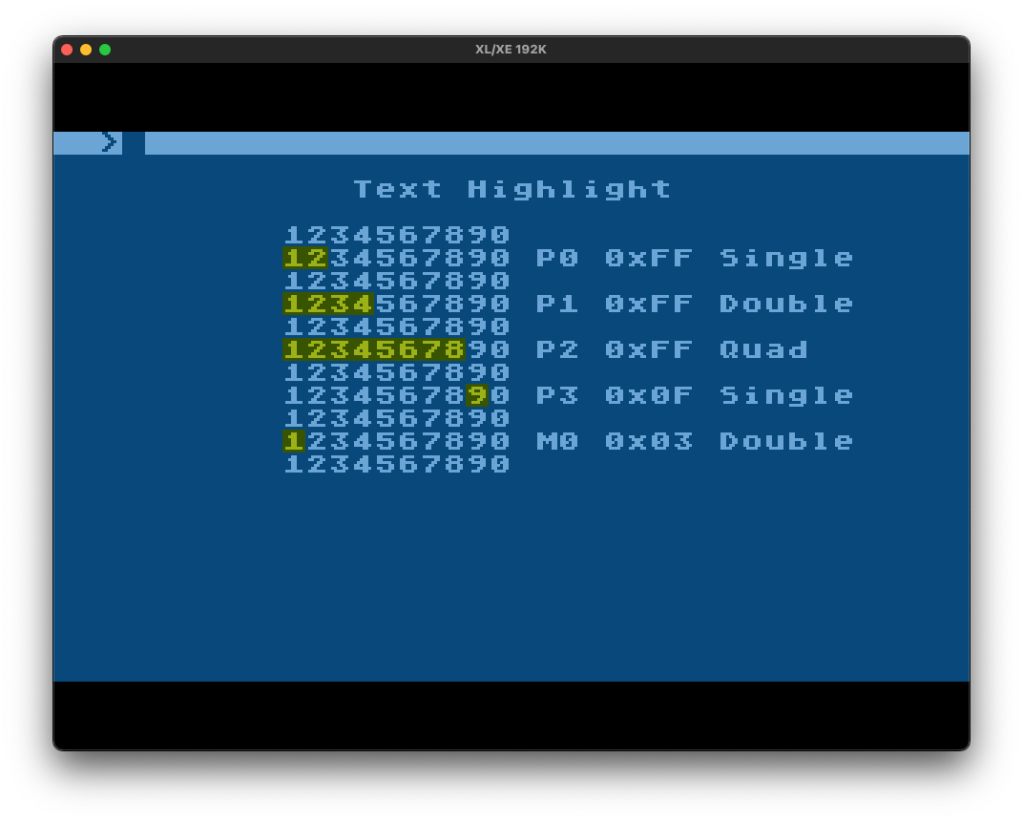
A screenshot of the end result:
The line labels on the right denote how each line was made:
“P0 0xFF Single” is player 0 formed from a 4 byte array consisting of $FF (all bits on) at single/normal player width to achieve 2 character coverage.
“P1 0xFF Double” is player 1 formed from a 4 byte array consisting of $FF (all bits on) at double player width to achieve 4 character coverage.
“P2 0xFF Quad” is player 2 formed from a 4 byte array consisting of $FF (all bits on) at quad player width to achieve 8 character coverage.
“P3 0x0F Single” is player 3 formed from a 4 byte array consisting of $0F (4 bits off, 4 bits on) at single player width to achieve 1 character coverage.
“M0 0x03 Double” is missile 0 formed from a 4 byte array consisting of $03 (bits 2 and 1 on) at double missile width to achieve 1 character coverage.
Code
The code is documented fairly well, and in combination with the description above, you should be able to see what is happening. If not, give me a shout. It does require the Action! Toolkit’s PMG.ACT and is coded for drive D2, change it if you need to.
; Prog..: PMHLTEXT.ACT
; Author: Ripdubski
; Desc..: Use P/M to highlight text
; Date..: 2022.06.29
; Notes.: Requires Action! Toolkit
INCLUDE "D2:PMG.ACT"
PROC main()
; Player1 is 4 lines/rows of 11111111
; Player2 is 4 lines/rows of 00001111
; Missile is 4 lines/rows of 11
BYTE ARRAY aPlyr1(4)=[$FF $FF $FF $FF],
aPlyr2(4)=[$0F $0F $0F $0F],
aMiss(4)=[$03 $03 $03 $03]
BYTE bLp
; Set graphics 0, already there.
Graphics(0)
; Turn on P/M
; Double line res for 8 rows from 4 row array!
PMGraphics(2)
; For each player
FOR bLp=0 TO 3
DO
; Clear data
PMClear(bLp)
; Set color to yellow
; Luminance of 4 is less than text(8)
PMColor(bLp,13,4)
OD
; Clear needed missiles
PMClear(4)
; Draw screen text
Position(13,2)
Print("Text Highlight")
Position(21,5)
Print("P0 0xFF Single")
Position(21,7)
Print("P1 0xFF Double")
Position(21,9)
Print("P2 0xFF Quad")
Position(21,11)
Print("P3 0x0F Single")
Position(21,13)
Print("M0 0x03 Double")
FOR bLp=4 to 14
DO
Position(10,bLp)
Print("1234567890")
OD
; Create each player in diff widths
; Param 4 is the width (1=N/S,2=D,4=Q)
; Param 5 is the x position
; Param 6 is the y position
PMCreate(0,aPlyr1,4,1,88,36)
PMCreate(1,aPlyr1,4,2,88,44)
PMCreate(2,aPlyr1,4,4,88,52)
; This player uses different array definition
PMCreate(3,aPlyr2,4,1,116,60)
; Create used missiles (only 1 here)
PMCreate(4,aMiss,4,2,88,68)
RETURN
There are many possibilities for using this technique.
In the last post I showed a function to trim a string. In this post I go the other way and demonstrate how to pad one. This is useful when trying to print data in alignment.
The Function
This function was primarily written to left pad numbers. As such there is a limit of 10 in length which is longer than the longest Action! number. The code is again pretty well documented and will be including in the next release of my Action! library. Here is short summary of how it works.
The procedure is called with 3 parameters. The first is a pointer to a character array, which can not be a static string and must be a variable because the length will be altered. The second parameter is the character you want to pad the string with. Common values are space and zero. The third parameter is the length to pad to (no more than 10).
First the procedure fills a temporary string with 10 of the desired pad character. Next it copies the incoming string into the padded temporary string at the furthest right position to accommodate the length of the incoming string, essentially right justifying it. Next the temporary padded string is copied back to the incoming string pointer, and the incoming string length is set to the specified pad length.
; --------------------------------------
; Proc..: StrPad(CHAR POINTER pS CHAR bc BYTE bL)
; Param.: pS=Pointer to string to pad
; bC=Character to pad with
; bL=Length to pad to
; Desc..: Left pads a string with a char
; Notes.: Max of 10 in length.
; --------------------------------------
PROC StrPad(CHAR POINTER pS CHAR bC BYTE bL)
; Declare a string filled with 10 spaces
CHAR ARRAY pA=" "
; Fill the temp string with desired char
; Use pA+1 which is the first character of the string.
; pA is the length of the string so skip over it.
SetBlock(pA+1, 10, bC)
; Copy incoming string into temp string
; Use desired length - incoming string length + 1 as position in temp string
; which puts incoming string at correct rightmost spot to accommodate its length.
SAssign(pA, pS, bL-pS(0)+1, bL)
; Copy newly padded temp string to incoming string
SCopy(pS, pA)
; Set incoming string pointer to new length
pS(0)=bL
RETURN
Sample Usage
Here is a short program demonstrating it usage. Note that in this example the StrPad() function is not seen as its been incorporated into the LIBSTR.ACT file as part of my Action! library. This will pad a byte, a card, and int to various lengths.
INCLUDE "D3:DEFINES.ACT"
INCLUDE "D3:LIBSTR.ACT"
PROC Main()
; Declare a byte, a card, an integer, and character array of 10 in length
BYTE bnum
CARD cnum
INT inum
CHAR ARRAY snum(10)
; Pad single character length byte to 2 positions with 0 character
bnum=1
; Convert the number into a string
StrB(bnum,snum)
; Call the pad function, passing the string, the pad character, and pad length
StrPad(snum, '0, 2)
; Show result
PrintF("Num: (2) [.....1]->[%S]%E",snum)
; Pad two character length byte to 4 positions with 0 character
bnum=21
; Convert the number into a string
StrB(bnum,snum)
; Call the pad function, passing the string, the pad character, and pad length
StrPad(snum, '0, 4)
; Show result
PrintF("Num: (4) [....21]->[%S]%E",snum)
; Pad five character length card to 5 positions with 0 character
cnum=64256
; Convert the number into a string
StrC(cnum,snum)
; Call the pad function, passing the string, the pad character, and pad length
StrPad(snum, '0, 5)
; Show result
PrintF("Num: (5) [.64256]->[%S]%E",snum)
; Pad five character length int to 8 positions with space character
inum=24768
; Convert the number into a string
StrI(inum,snum)
; Call the pad function, passing the string, the pad character, and pad length
StrPad(snum, 32, 8)
; Show result
PrintF("Num: (8) [.24768]->[%S]%E",snum)
; Pad six character length negative int to 8 positions with space character
inum=-24768
; Convert the number into a string
StrI(inum,snum)
; Call the pad function, passing the string, the pad character, and pad length
StrPad(snum, 32, 8)
; Show result
PrintF("Num: (8) [-24768]->[%S]%E",snum)
RETURN
This post will demonstrate a function to trim a string. By trim, I mean to remove all trailing spaces and stop at the first non space character.
The Function
Here is the function, which I’ve added to my Action! library. A new version will be released soon that will include recent additions and many fixes. It’s pretty well documented, but here is a short summary.
The procedure is called by passing a reference to a character array in (the string you want to trim). This procedure will modify it directly, so it can not be a static string and must be a variable. The procedure will start by setting a counter to the length of the incoming string. It will move from the end to the beginning by decreasing this counter. It examines the character at the counters position in the string. If it’s a space, it sets the the new string length to the counter position minus one (to eliminate the space). If it’s not a space, the procedure exits having found a termination point. Each iteration through the loop, the counter is decremented by one to move one character left.
; --------------------------------------
; Proc..: StrTrim(CHAR POINTER ps)
; Param.: pS=Pointer to string to trim
; Desc : Trims space from string end
; --------------------------------------
PROC StrTrim(CHAR POINTER pS)
BYTE bL,bC
; Set counter to end of string
bL=pS(Ø)
; Loop from string end to start
while bL>=1
DO
; If char is space, set len to curr-1
if pS(bL)=32 then
bC=bL-1
else
; Char is not space, exit loop
exit
fi
; Decrease counter
bL==-1
OD
; Set string pointer length to new value
pS(Ø)=bC
RETURN
Sample Usage
Here is a sample program demonstrating its use. Note that the function has been incorporated into the file LIBSTR.ACT so you don’t see it in this source:
; Include library file that has StrTrim() in it.
INCLUDE "D3:LIBSTR.ACT"
MODULE
PROC Main()
; Declare character array of 20 in length
CHAR ARRAY cA(20)
; Copy some content in the char array defining all 20 chars
SCopy(cA,"12345 abc ! ")
; Print it to show a valid padded definition
PrintF("B4 : [%S]%E",cA)
; Call the trim function passing the char array pointer
StrTrim(cA)
; Print it again to show its been trimmed
PrintF("Aft: [%S]%E",cA)
RETURN
Output
Here is the output from the program showing it works:
Over the course of my interactions with Action!, for whatever reason, I never had a need for defining a string value. While numeric definitions are cake, string ones turned out not to be so much.
Let’s explore what I wanted to do. I wanted to compare a variable that was input against a static string. Why not just hard code the string? Well, it is used in multiple locations, and having it DEFINEd makes it easy to change in all of them at once. Thats the whole point of using DEFINE. The source code I wanted to write:
if SCompare(sA, SSREADY) = 0 then
So using a define for SSREADY in an INCLUDEd source file accomplishes the goal of making it easy to change in just one place and use it multiple times across projects. Something like this was needed for my code work:
DEFINE SSREADY = "TEST"
That works for numbers with no problem:
DEFINE NVAL = "100"
Anywhere that NVAL is found in the source, it will be replaced with 100.
So what is the issue? Used in the context of SCompare above, it ends up producing code like this:
if SCompare(sA, TEST) = 0 then
Obviously thats not the intent of the source and it won’t work, and the compiler will tell you so immediately. The compiler will think TEST is an undefined variable. The word TEST needs double quotes around it. Thats the goal.
Reading through the manual you will understand that in order to print double quotes, you have to precede each one with another. Such as:
PrintE("Hello ""world""!")
which produces the output:
Hello "world"!
So moving back to the DEFINE statement it appears it needs to look like this:
DEFINE SSREADY = ""TEST""
But that doesn’t work either. The compiler doesn’t like it. The solution is to wrap the dual double quoted value in another set of double quotes. But there is a caveat – they can not be all run together, or the compiler doesn’t understand which two of the 3 should be translated into a single double quote. So you need to place a space between the DEFINE’s double quotes and the values double quote pair. The proper syntax for DEFINEing a string value is:
DEFINE SSREADY = " ""TEST"" "
Here is a sample program that demonstrates this concept:
FujiNet is a fantastic new device for the Atari 8 bit line of computers which provides WiFi, and SD card storage among other things, all over SIO. One of the functions provided is APETIME support, a protocol developed by AtariMax as part of their Atari Peripheral Emulator (APE).
After completing the BASIC version, I moved to creating an Action! version. This post details my solution. I wrote the routine into a procedure which can be called from the main program at any point. It only requires passing a pointer to a 6 byte array.
After failing to get success using the described 5 byte assembly procedure on the FujiNet wiki by using an inline assembly code block, I instead created a procedure with the name SIOV and setting its address to the OS SIO vector address.
The routine that gets the time from FujiNet is the FNGTime() procedure (FujiNet Get Time). It first sets the DCB variables with their addresses set to the DCB (Device Control Block) memory location. This is convenient for assigning (poking) values into those locations, with no need for the Poke function.
Next it sets up the SIO call by assigning the appropriate values into the DCB. It sets the buffer location (DBUF), to the address of the byte array passed in.
Last it calls the SIO vector using the SIOV procedure.
The main routine sets aside 6 bytes of storage, calls the FNGTime() routine with the address of the storage array, then prints the result in a friendly fashion.
; Prog..: FNTIME.ACT
; Author: Wade Ripkowski
; Date..: 2021.02.01
; Desc..: Gets date/time from FujiNet
MODULE
; -----------------------------------
; Proc..: SIOV()
; Desc..: OS SIO Vector
; -----------------------------------
PROC SIOV=$E459()
; -----------------------------------
; Proc..: FNGTime(BYTE ARRAY bA)
; Desc..: Get date/time from FujiNet
; via APETIME protocol
; Return: 6 bytes DMYHMS into bA
; -----------------------------------
PROC FNGTime(BYTE POINTER bA)
; Set DCB variable pointers
BYTE DDEVIC=$300,
DUNIT=$301,
DCOMND=$302,
DSTATS=$303,
DTIMLO=$306
CARD DBUF=$304,
DBYT=$308
; Setup SIO call using byte array address
; by putting values into the DCB.
; APETime=Device 69 ($45), Unit 1
; Time command=147 ($93)
; Get 6 bytes, timeout just over 15s
DDEVIC=69
DUNIT=1
DCOMND=147
DSTATS=64
DTIMLO=15
DBUF=bA
DBYT=6
; Call SIO
SIOV()
RETURN
; -----------------------------------
; Main Routine
; -----------------------------------
PROC Main()
; Storage for 6 bytes preset to 0
BYTE ARRAY bDT(6)=[0 0 0 0 0 0]
; Call time routine with the storage array
FNGTime(bDT)
; What time is it?
PrintF("Date: 20%B.%B.%B%E",bDT(2),bDT(1),bDT(0))
PrintF("Time: %B:%B:%B%E",bDT(3),bDT(4),bDT(5))
RETURN
I’m going to include the FNGTime() function in my Action! library which was developed in 2016 and released in early 2017 right here on this blog (search posts with Action! tag), and is now at version 1.5 and will be re-released soon as an update.
A few people have been following the Action! posts and attempted to compile the code only to find there were some missing unpublished routines (unfinished bits 😉 ). The routines do in fact exist. I thought I had published all of it in pieces, apparently not. Attached here is the complete library. You will need to remove the .ODT file extension leaving just .ATR. It is NOT an ODT file, WordPress wouldn’t allow the ATR file type.
What good is any program without a menu? Not much. Without menus you are relegated to memorizing keystroke commands to perform different functions. Because menus are so intuitive to use, that was the next gadget I focused on for my Action! Windowing Library. Maybe this library needs a name now? I’ll think about that.
In this post I detail the function created to present the vertical menu, describe how it works, then finish with a demonstration program, with bonus video of the demonstration in action (pun intended 🙂 ).
Function
This gadget is named GMenuV. The menu is navigated using the UP, DOWN, ENTER, and ESC keys. UP moves the selection indicator up, DOWN moves the selection indicator down. The selection indicator will roll from top to bottom and vise-versa. ENTER selects the currently highlighted item. ESC will exit the menu.
The parameters required are:
bN = BYTE, window handle to display the menu in
x = BYTE, x (column) position in the window to display the menu
y = BYTE, y (row) position in the window to display the menu
w = BYTE, width of each menu item (must be one size fits all)
pS = CHAR POINTER, string containing each menu item without delimiters
The function returns a BYTE value which will be the number of the selected menu item or 0 if ESC is used to exit.
Further documentation of the function is inline:
; --------------------------------------
; Proc..: GMenuV(BYTE bN,x,y,w CHAR POINTER pS)
; Desc..: Displays vertical menu
; Params: bN = number of window handle
; x = column for cursor
; y = row for cursor
; w = width of menu items
; pS = menu items string
; --------------------------------------
BYTE FUNC GMenuV(BYTE bN,x,y,w CHAR POINTER pS)
; Variables used
BYTE bL,bR,h,bC,i,bK
; String to hold 1 menu item of max size (38)
CHAR ARRAY cL(39)
; Set item number default in return value
bR=1
; Compute # items based on length of the menu string
; and specified width of each item.
bC=pS(0)/w
; Repeat until done
DO
; Display each item using a loop
for bL=0 to bC
DO
; Compute menu item position in menu string
h=(bL*w)+1
; Copy menu item into temp string from menu string
; starting at the computed position, up to the
; position plus the menu item length
SCopyS(cL,pS,h,h+w)
; If current item is the selected item,
; inverse the selection
if bL+1=bR then
; Inverse the string
for i=1 to cL(0)
DO
cL(i)==!128
OD
fi
; Print item at column,row count within window
WPrint(bN,x,y+bL,cL)
OD
; Get key
bK=WaitKC()
; Process key
; -- DOWN --
if bK=KDOWN then
; Increment item number
bR==+1
; If item number is greater than max, set to 1
if bR>bC then bR=1 fi
; -- UP --
elseif bK=KUP then
; Decrement item number
bR==-1
; If item number is less than 1, set to max
if bR<1 then bR=bC fi
; -- ENTER --
elseif bK=KENTER then
; Exit loop
EXIT
; -- ESC --
elseif bK=KESC then
; Set item number (return value) to 0, exit loop
bR=0
EXIT
fi
OD
; Return item number selected
RETURN(bR)
Example Program
This sample program utilizes many pieces of my Action! Windowing Library. It is well documented so I will not break it down. Feel free to ask questions if needed.
; Program: WINMENUV.ACT
; Date...: 2016.07
; Desc...: Test Window Program
; License: Creative Commons
; Attribution-NonCommercial-
; NoDerivatives
; 4.0 International
; Include library
INCLUDE "D3:DEFINES.ACT"
INCLUDE "D3:DEFWIN.ACT"
INCLUDE "D3:LIBSTR.ACT"
INCLUDE "D3:LIBWIN.ACT"
INCLUDE "D3:LIBMISC.ACT"
INCLUDE "D3:LIBGADG.ACT"
; Start
MODULE
PROC Main()
; Window handles and other byte vars
BYTE bW1,bW2,bW3,bCh,bLp,bS
; Menu strings
CHAR ARRAY cM(31),cM2(57)
; Init Window System
WInit()
; Open window 1 (title)
bW1=WOpen(2,2,36,3,WINVON)
WPrint(bW1,WPCENT,1,"Unfinished Bitness")
; Open window 2 (main menu)
bW2=WOpen(15,7,9,5,WINVOFF)
WTitle(bW2,"Menu")
; Define main menu
; Each item is stacked back to back using the
; full width of the desired display size.
; This example is 7 characters.
SCopy(cM," Open> Close Exit ")
; Do this until exit
DO
; Display main menu
; In window bW2 at position 1,1 (of window)
; with menu items 7 chars wide,
; in the char string cM.
; Save returned selection to bCh.
bCh=GMenuV(bW2,1,1,7,cM)
; Process choice
; -- OPEN --
if bCh=1 then
; Open window 3 (sub menu)
bW3=WOpen(22,8,16,6,WINVOFF)
; Define sub menu
; Submenu uses 14 character strings.
SCopy(cM2," FILENAME.001 FILENAME.002 FILENAME.003 FILENAME.004 ")
; Display sub menu
; In window bW3 at position 1,1 (of window)
; with menu items 14 chars wide,
; in the char string cM2.
; Save returned selection to bCh (not used here).
bCh=GMenuV(bW3,1,1,14,cM2)
; Close sub menu window
WClose(bW3)
; -- EXIT --
elseif bCh=3 then
; Exit loop
exit
fi
OD
; Close open windows
WClose(bW2)
WClose(bW1)
RETURN