
This post has been a draft for a long time, it’s time to publish it! It explains how to setup a Synology DiskStation NAS running DSM (Disk Station Manager) to serve web pages (including PHP) and provide SQL services (via MySQL). Your NAS can still sleep properly with this setup while giving you the benefit of running a LAMP stack. The average user won’t need this. If you know what PHP, SQL, and LAMP are then you might be interested.
I needed this to host an application I wrote in PHP that uses MySQL on the backend to store data. When I maintained an externally hosted web site it was running there. I rely on the application but no longer wanted to maintain the external web site, so this solution came about. Purely for reference, my application is for vehicle service history.
- First you need to login to the DSM interface as the root/admin user.
- Next enable PHP by navigating to Control Panel / Web Services / PHP Settings. You’ll want to enable the PHP cache and safe mode options. Click “Apply” to turn it on:
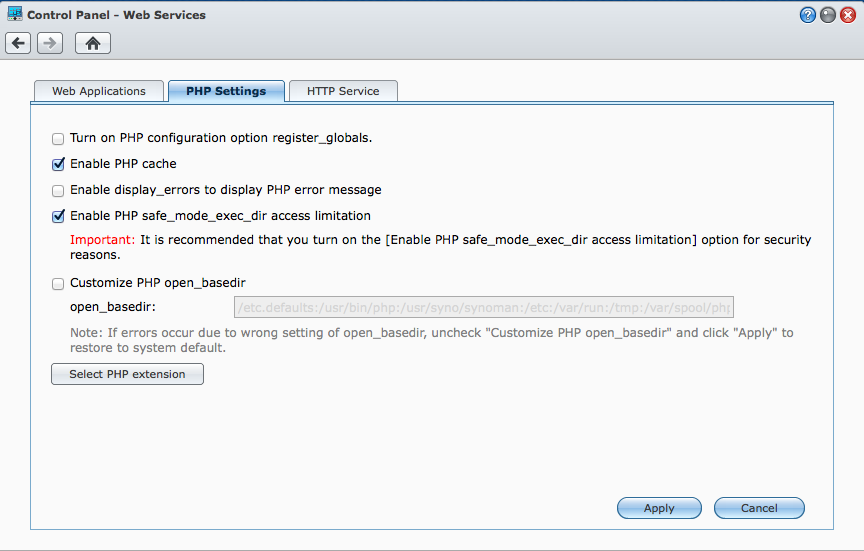
- Next click “Select PHP extension”. You will need to turn on at least the “mysql”, “mysqli”, “pdo_mysql”, and “dba” extensions. I used a few others; “get text” and “mcrypt”. Click OK when done:

- Next enable the web server and MySQL server by navigating to Control Panel / Web Services / Web Applications. Unless you closed the window, you should be able to just select the “Web Applications” tab. Check the “Enable Web Station” and “Enable MySQL” options, then click “Apply” to turn them on:

- Before closing the window click on the “Virtual Host” button under “Enable Web Station”. This is where you will define a URL name and sub-folder to store the application. In my case I stored it in a folder called “servicehistory” and gave it a URL name of “servicehistory.home”. The name given must be resolvable on your network. If you are using DD-WRT router firmware, you can enable local DNS as I described in this post. Click OK when done:

- Now the web and database service is available. You need to install the database management package (phpMyAdmin). Open Package Center from the Application Panel:

- Click “Utilities”, find “phpMyAdmin”, click the “Install” button. You may also need to install “Perl” if your application needs it:

- Next you need to make sure the packages are running. Click “Installed”, find the package, click “Run”. Close the Package Manager when done.
- Next you need to login to phpMyAdmin and set the root password. From the Application Panel, select “phpMyAdmin”. Login as “root”. There is no password initially.
- Click “Change Password”. Enter a new password, re-enter the new password, and click “OK”.
- Now you can create databases and tables as you see fit. Close phpMyAdmin when you are done:

- All that is left is to populate your application into the web server directory as specified in the Virtual Host definition (in my case “servicehistory”). You can use SCP if you have SSH enabled, or the Synology File Manager. Include any and all folders and files your application needs:

- Now you should be able to access your application from the Synology NAS web server by entering the URL you set in the Virtual Host setting into your browser (in my case “servicehistory.home”):

That’s it! You can also serve multiple applications by creating multiple virtual hosts and placing those applications in the proper directories.


